<Disclaimer>
I didn’t write this post to aid hackers, but to make sure all these cameras are taken offline as soon as possible. I don’t accept any responsibility for hacks committed with this information, nor do i endorse malicious use of this information. Remember that wrongly used this information, depending on where you are could be a federal offence that lands you some serious prison-time. Additionally, all the tests i did was on my own equipment, running a battery of different firmwares.
</Disclaimer>
I bought a Conceptronic CNETCAM (Embedded linux web-based security camera) some years back. After a burglary in my place it gave me that extra feeling of security to be able to login and see that all was good at home if i ever was worried. It was cheap but lacked a lot in the web-design-department. I figured if i changed the firmware, it could look nicer and run a fullscreen picture instead of the sorry ass borders created by conceptronics. I downloaded the firmware and started to analyzing the binary file using strings and greping for html-tags. I could see html pore by my screen in clear-text, meaning no compression was used on the binary file that constituted the firmware. Great, this simplified the process a lot.
I started by changing the colours around, uploaded the firmware, rebooted the camera and it all worked fine, my colours were applied. “Awesome”, i thought.. This will allow me to mod the webpage without extracting and re-compiling a working firmware file as long as my HTML code could fit the same space as the old code used. I did a few more changes but this time uploading it gave a error message indicating that the firmware checksum was wrong.
While trying to find the checksum that must have caused the update error, i looked around the web for people that might have done this before i found almost nothing for this specific camera.
I decided i might get lucky with a google-dork and searched for part’s of the html-title, some distinct text on the page where the camera could be viewed and added parts of the url to the document in the query. Bingo! Around 75.000 hits. While looking through the results i fast realized that google removed part of my query, namely “Conceptronic” and 99% of the results had everything my dork demanded but the name of the vendor. Some cameras where D-link DCS-900, some SparkLAN CAS-330 and about 5 other vendors, all using the same basic html-code. But none of them had a tool embedded in their GPL-code which allowed me recompile a new firmware from scratch.
I figured maybe another vendor had the tool so I turned the process around. The camera i bought had a really distinct look. It was thin, wide and long, with a large screw around the lens to adjust focal length. I googled “Ip web camera”, choose “Images” and started looking around. I found another 5 vendors with very similar design while going through the hundreds of images in the search, and started mapping them out. As a test I downloaded the Sparklan CAS-330 firmware, uploaded it to my camera, rebooted…. and it just worked. My camera just changed interface to the classical blue sparklan interface, but every function worked. I was surprised because i kind of expected to brick it.
This is where it all took a sharp turn. While playing around with my own camera, flashing it with loads of different firmwares from a heap of other cameras with same appearance, specs and functions i accidentally broke a script i wrote and managed to flash the device with an error. I actually flashed it over and over and just saw a error flashing by the CLI that didn’t seem to matter as the camera rebooted and came back again with the changes i made in place. I started debugging the script, found my typo and realized with this bug in place, there was NO WAY it should would have managed to authenticate to the camera, it just firmware flashed without caring who i was.
I wrote a simple html document
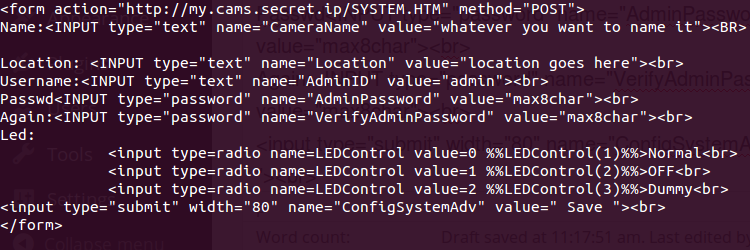
and loaded it in my webbrowser, and clicked Save. The camera died for a few seconds then prompted me to login again. I entered the same username and password as i just saved. It worked!
I could not believe my eyes. Looking at all possible html documents in the webroot, i realized most of the documents on the embedded webserver was susceptible the same XSS-attack. I could not view many of the html-pages without being authenticated, but i could do a POST-GET and apply new values as long as all input-strings needed were there. I could change the password, flip the image upside down, set the capture resolution and all other functions in the camera.
I started compiling a list of my finds, mostly cameras that looked alike it, had similar paths in the webUI and the size of the firmware. Flashing my own camera over and over with all these different cameras firmware i confirmed that this bug could be found in most of the cameras i suspected had the same initial manufacturer. I turned my eyes back to Conceptronic again. Turns out that Cellvision (a Chinese OEM-vendor, now owned by Sparklan ) made the original code and OEM-sold it to Conceptronic but that tons of other companies also did the same. All of them just branded them with their own logos, without changing anything but the webUI.
I figured i could not be the first to have made this find and it turns out some people had found a XSS exploit on a single make or model, but no-one seem to have understood they were actually all the same camera. I was amazed.
Did i just find a way to get root on 75.000 cameras?
It seems i had. I started realizing how bad this was. 75.000 people had trusted these devices to the extent that they port-forwarded them through their DSL-modem or corporate firewalls, right into the inside of their networks. As this hack actually allowed me to upload a new firmware that seemed to work cross all these cameras, i could have written a firmware that allowed me to nmap their whole infrastructure and display this information to me on the outside. Once i had this information another firmware could route the webserver to an hardcoded internal IP and port, actually granting me access to ANY of their internal services, just like i was in their network. Needless to say this could all be scripted and automated, making the collection of information and routing more or less instantaneous.
At the point of this discovery most of the cameras were at or near their end of life by the vendor, but still actively used by people and companies so i decided to sit on the information rather than sharing it with the world. Today all of the cameras are EOL’ed, but quite a few are still out there. As i don’t want to help people abusing this, i will not share the complete list of models and makes but rather say:
If you have a camera that looks something like this
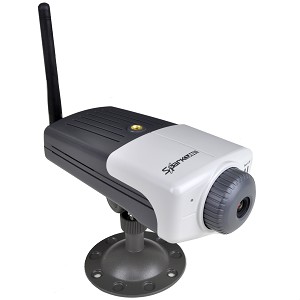
i strongly suggest you write a html-document like the one above, change the hostname to it’s IP (and :port if you don’t run it on port 80) and see if it is vulnerable. I would also like to point out that none of the firmware updates available to any of the different camera firmwares i was playing with actually solved this specific issues, and as of today i doubt anyone will.
Hope someone finds this information useful.